Sewing tip: Easy peasy spaghetti straps with a serger

Ever try to make spaghetti straps? Seems doable, right? Just sew down one side of a strip of fabric that’s been folded in half lengthwise…then turn it to the right side…wait, how the heck do ya turn it?!? Sure, you can use the old safety pin trick to try and push one end through the other, but what if your strap is too thin? What if your safety pin opens half way through pushing it through?

TRY THIS! If you own a serger, making spaghetti straps just got real easy!

First, make a long chain stitch by serging with no fabric (you want this chain to be the same length as your fabric strip or longer). Pull on the chain stitch to lengthen.

20130321-160636.jpg

Next, lay the chain stitch down the middle of your fabric strip and fold fabric in half.

20130323-231836.jpg

Now, serge down the right portion of the fabric strip, making sure to avoid the chain stitch thread. Serge all the way down the strip and cut the end of the chain stitch.

20130323-232005.jpg

Now, pull on the end of the original chain stitch that’s laying down the middle of your new fabric tube.

20130323-232232.jpg

Keep pulling so that the tube slides through the other end, pulling itself right-side out.

20130323-232504.jpg

20130323-232514.jpg

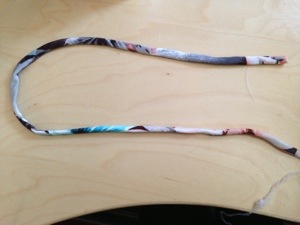
Pull on the chain stitch until you’ve turned the entire tube right side out. And now, you have a spaghetti strap!

20130323-232715.jpg

Sewing tip: Re-attaching an existing zipper

Ever find yourself with this problem?

20130311-150249.jpg

I bought this pair of skinny jeans for a mere $8 since the zipper needed mending. I’m a sewer so I figured it’d be a quick fix . Well, time has gone by and I haven’t found the time to mend them until now. Luckily, I had just enough matching thread leftover from another project.

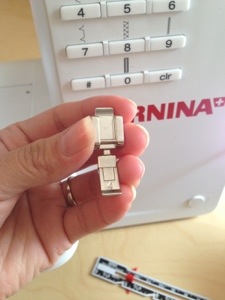
So, I pulled out my zipper foot.

20130311-165626.jpg. And I moved my needle to the left position…if you have a Bernina, make sure you do this or you’ll break a needle.

20130311-165942.jpg

With any machine, I advise you to check your needle position any time you place a different foot on. I do this by manually turning the dial to make my needle move to the down position. This way you know if you need to move your needle position to the left or right (and you won’t break a needle!).

20130311-170445.jpg

20130311-170514.jpg

Now, I just placed the foot down on the zipper, turned my dial by hand to place my needle down and made sure it was lined up with the existing stitching.

20130311-174056.jpg

I sewed a straight stitch down the side of the zipper. It does get a little tricky down at the bottom since it get bulky and you’ll have to smash your zipper down a bit (or maybe just zip it up!). Make sure you reinforce your stitch when you start and stop…maybe you can avoid having to mend it again!

20130311-174926.jpg

Now, your zipper is back in place! And it’s time to rock your cute jeans again 😉

20130311-175215.jpg

20130311-175223.jpg

Follow me on Twitter & Pinterest @RefashionMama or LIKE RefashionMama blog page or LIKE RefashionMama Boutique

Sewing tip: When your machine just wants to eat up your knits

I love knits! I honestly prefer sewing with knits over any other fabric. People look at me crazy when I say that. Yes, knits can take some time getting use to, but in my experience, they are also the most forgiving when it comes to fit!

When I first started sewing, I’d grab something from my closet and cut it up to refashion. Knits were my go-to since I didn’t use patterns and I could just guess my way through sizing. Now I have a better understanding of fabric and sizing and I still LOVE knits!

With that being said, I have found some knits to be finicky and at times my machine has tried to eat them! Okay, maybe she’s not trying to eat them, but she sure acts like it 🙂

I have my stretch needles in, my tension set, everything in order but some times it just won’t happen. But I discovered this magical little thing…

20130214-192712.jpg

Well, I tried this little trick, placing tissue paper under the fabric as I sewed…even used a stretch double needle to hem a tunic and not once did my Bernina try to eat the fabric!

20130214-192825.jpg

20130214-192837.jpg

So, I thought why not share this little trick with all of you. I know you can buy stabilizer at the sewing store but why spend money on that when you can buy a packet of tissue paper anywhere for 99 cents?!?

Give it a try! Seriously, just lay the tissue paper under your fabric and sew through just like it’s another layer of fabric! Pull the tissue off after your finished and you have a beautiful stitch!

20130214-193040.jpg

Vintage-Patch review & giveaway

If you follow me, you know I live in jeans! I wear them (almost) every day and easily own 20 pairs, with 5 or 6 being my regulars! And just like most girls, I have 1 pair that is my ABSOLUTE favorite and I’ve worn them out over the last few of years. In fact, what started as a thinned out area over my left knee, soon became a small tear that ripped more and more and ended up stretching across my entire knee. I posted on my facebook blog page asking for suggestions on how to fix/cover the hole. I received several great suggestions from buying denim to patch it or adding lace underneath to dress it up. I would love to try the lace option but I honestly haven’t had the time to figure it out.

Then, I was contacted by Vintage-Patch offering to send me a pair of their beautiful vintage patches to try & review. I jumped at the offer as it was the best option for me…pre made, pre-cut, sticky on the back, option to sew (or not). Also, after looking at her fabric options, i was even more excited! How could I say no?!?

So, I received the patches in the mail and she even sent extras so I could try a couple and do a giveaway.

20121210-111527.jpg

I took my most beloved jeans with the big hole in the knee…

20121210-111759.jpg

Picked out my fav patch.

20121210-111913.jpg

See this pretty vintage patch?

20121210-112012.jpg

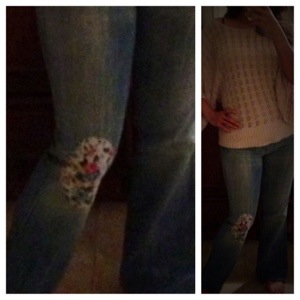
Following the directions it came with, I removed the backing and pressed it on, ironing it in place.

20121210-112115.jpg

My fav jeans + vintage-patch <;;;;;;;;;3

20121210-112250.jpg

I hand-stitched around the patch.

20121210-112547.jpg

I’ve worn my favorite jeans several times now to see how the patch held up. It’s awesome! It’s definitely doing its job and looking quite lovely at the same time!

20121210-112816.jpg

They just launched their new Vintage-Patch website where you can view/order knee and elbow patches with your choice of fabric. Check it out and view all of the options 🙂

So…who wants to WIN A FREE SET OF VINTAGE PATCHES to try on their own?!? Enter the giveaway at Vintage-Patch Giveaway

Refashion: Old to new lace tee

Just wanted to share a refashion from an old lace coat into a cute modern toddler tee. I love how it turned out and can’t wait to pair it with a basic tee and skinny jeans on my daughter 🙂

I took this lace coat a friend of mine sent.

20121116-192418.jpg

Cut out a basic tee shape from the bottom of the coat so I could incorporate the pretty scalloped bottom.

20121116-192556.jpg

20121116-192604.jpg

I kept one button to use on the backside of the shirt, turned the new tee inside out and sewed the seams. Here’s the back of the lace tee.

20121116-192758.jpg

Here’s the front of the toddler lace tee.

20121116-192820.jpg

My daughter decided to model it for me 🙂

20121117-233353.jpg

20121117-233404.jpg

20121117-233413.jpg

20121117-233421.jpg

How to make a v-neckline

I love raw unhemmed edges, but some fabric calls for a finished hemline. I realized this shirt needed a finished neckline to complete the look!

20121113-230659.jpg

I won’t pretend that this is the proper way to finish a v-neckline, but this is the way I do one. It is fairly simple too!

As you can see, I cut a moderate v-neckline on the shirt. I took the excess fabric and measured around the neckline for length. I cut a 2″ strip of the extra fabric.

20121113-231045.jpg

I folded it in half lengthwise.

20121113-231110.jpg

Next, I folded it in half again, this time against the width instead of length.

20121113-231211.jpg

I took the folded end and sewed a diagonal stitch to create the v at the middle of the neckline. Make sure that the fabric fold is opposite to the point in the v.

20121113-231315.jpg

20121113-231322.jpg

Cut off the excess fabric.

20121113-231501.jpg

Now, open it to see the v shape! Make sure that the open end of the fabric is at the bottom.

20121113-231551.jpg

Next, pin the strip to the shirt making sure that the right sides of the fabric are facing. Start pinning at the v and go all the way around.

20121113-231712.jpg

20121113-231724.jpg

20121113-231735.jpg

20121113-231746.jpg

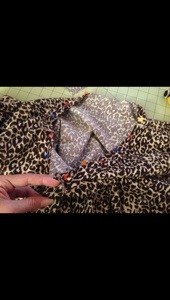
Now, sew or surge these pieces together, going all the way around the neckline.

20121113-231843.jpg

Lastly, top stitch around the entire neckline to help it lay flat and look more professional.

20121113-232024.jpg

Now, admire your work!

20121113-232052.jpg

Follow me on Twitter or Pinterest @RefashionMama of like and please check out my new RefashionMama Boutique

Infinity scarf with a lil twist

I love how popular infinity scarves are and I’ve made so many now that I can’t even count!

Recently, I’ve been wanting to try something new so I’ve made a couple new styles.

I ❤ how this one turned out! I alternated the stripes on the mama scarf for a new effect.

20121113-125204.jpg

It’s actually two matching scarves, one larger for mommy & the other smaller for a child. Just layered them for a fuller, chunkier scarf.

20121113-125705.jpg

I also tried a different technique on this one using two different fabrics and sewing the squares together before creating the scarf.

20121113-130111.jpg

All are available for purchase in my RefashionMama Boutique

Refashion: Dress turned into scarf

After cleaning out my closet the other day, I discovered some beautiful fabric I had, most of which were dresses and tops.

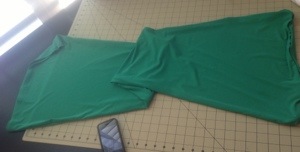
I decided to refashion this one for my niece since she loves green.

20121030-110712.jpg

I chopped of the top portion (to refashion later) and opted to use the skirt. I separated the front of the skirt from the back.

20121030-110936.jpg

Then I separated each panel.

20121030-111041.jpg

I wanted it to be longer in length and thinner in width so I attached the panels to add length and ended up with 2 longer pieces.

20121030-111141.jpg

20121030-111146.jpg

I sewed them together right sides facing, leaving one end open to turn it right side out.

20121030-111306.jpg

And it became a lovely scarf 🙂

20121030-111328.jpg

20121030-111334.jpg

RefashionMama Boutique

Just wanted to share my new facebook boutique page! My new online store will be up soon so I started a new page just for my store. Please LIKE RefashionMama Boutique

I’m currently having a SALE now on several already made items.

20121018-152551.jpg

Cutie in her birthday dress

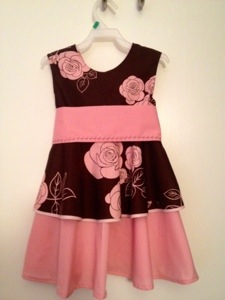
Remember the pink & brown birthday dress I made last week?

20120916-215133.jpg

Thanks to this little cuties mama, I’m able to share her birthday pics so you can all see her in her dress 🙂

Isn’t she GORGEOUS!?!?

20120916-215243.jpg

Backside of her pretty dress

20120916-215325.jpg

One more pic just because she’s super cute!

20120916-215354.jpg